SDK Import and Initialization
1. Integrating HyperBid into Your Unity Project
To begin, please download the latest version of the HyperBid SDK:
System Requirements:
- Unity 2020.3.34f1 or later
- Android Platform: Minimum Android 6.0, API Level 23
- iOS Platform: Minimum iOS 12, requires Xcode 16.2
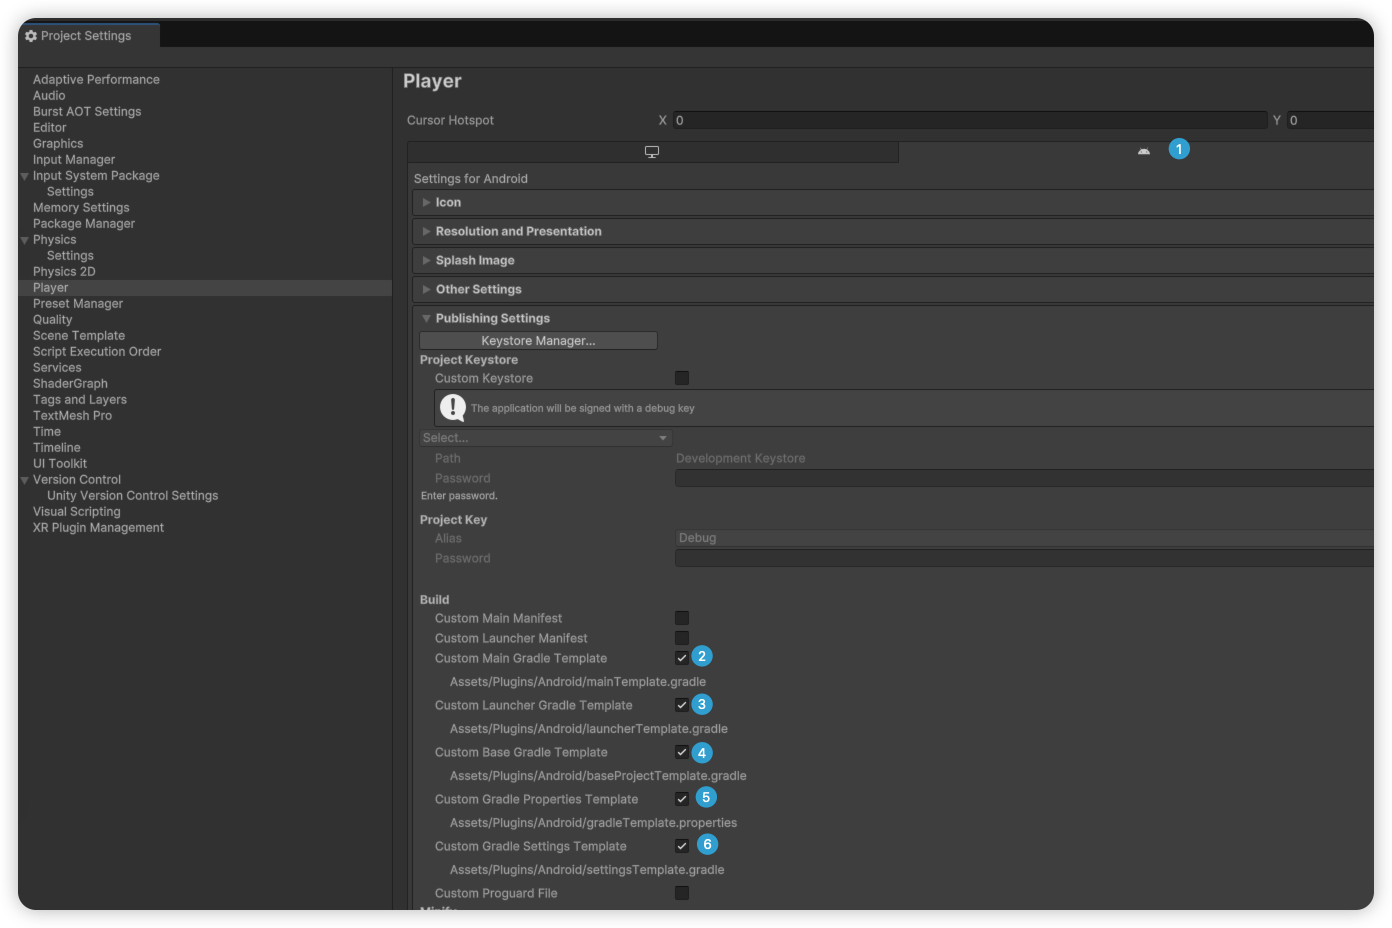
1.1 Enabling Gradle Templates
To streamline dependency management, it is recommended to enable Gradle template functionality for Android builds within the Unity Editor.
Navigation Path: File > Build Settings... > Player Settings... > Android > Publishing Settings > Build
Ensure that options ② through ⑥ are selected as illustrated below.
1.2 Importing the SDK Package
Follow the steps below to import HyperBid into your Unity project:
- Ensure your target project is open in the Unity Editor
- Double-click the downloaded
.unitypackagefile; alternatively, navigate toAssets > Import Package > Custom package...for manual import

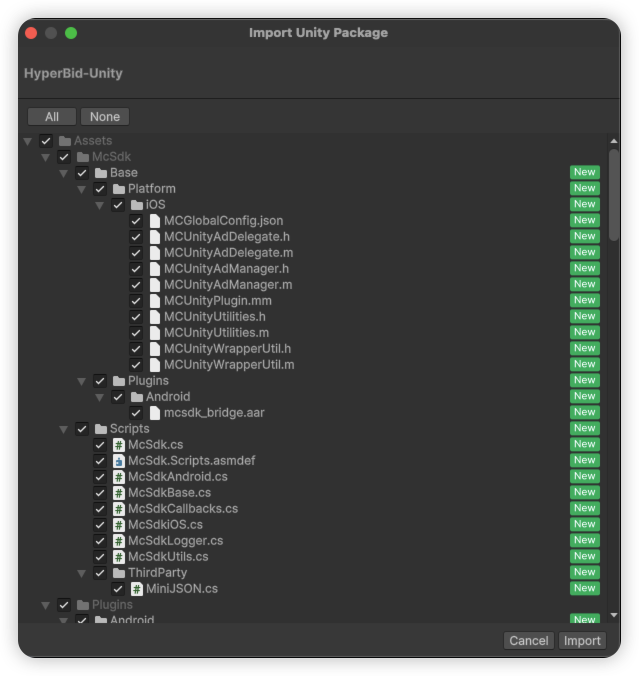
Unity will load and parse the package, subsequently presenting a confirmation dialog that enumerates all files to be imported. Click the Import button to finalize the process.
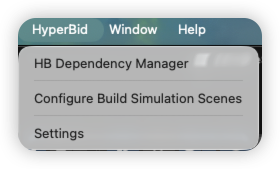
2. Configuring SDK Settings
The settings panel allows you to configure the Google Ads Application ID.
Navigation Path: HyperBid > Settings
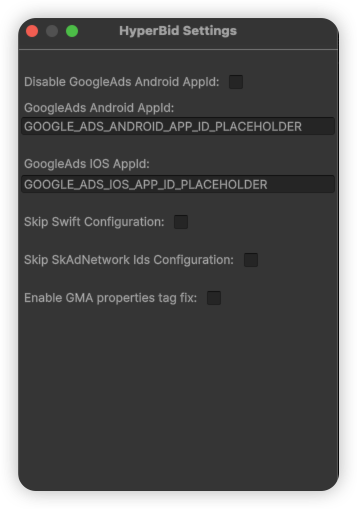
The configuration options are detailed as follows:
| Configuration Option | Description |
|---|---|
| Disable GoogleAds Android AppId | When enabled, bypasses the automatic addition of GoogleAds AppId to AndroidManifest. Suitable for projects where this ID has already been configured elsewhere |
| GoogleAds Android AppId | The Google Ads Android Application ID, which will be written to the final AndroidManifest file (required if the above option is not selected) |
| GoogleAds iOS AppId | The Google Ads iOS Application ID, which will be written to the Info.plist file |
| Skip Swift Configuration | When enabled, bypasses Swift environment configuration for the iOS Xcode project. While HyperBid itself requires Swift support, this option may be activated if another tool already handles this configuration |
| Skip SkAdNetwork Ids Configuration | By default, the SDK automatically appends relevant SKAdNetwork IDs to Info.plist. Enable this option to suppress this behavior |
| Enable GMA properties tag fix | Activates the GMA properties tag fix (refer to "Compatibility Handling for Unity 2021 and Earlier Versions" below) |
💡 Tips
If you are integrating with AdMob, you must provide the GoogleAds AppId
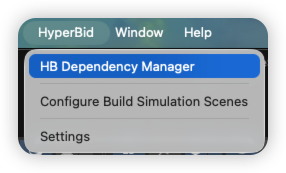
3. Installing Ad Network Adapters
To integrate additional ad networks, navigate to HyperBid > HyperBid Dependency Manager to open the Dependency Manager.
This interface displays all available adapters along with the current HyperBid version information.
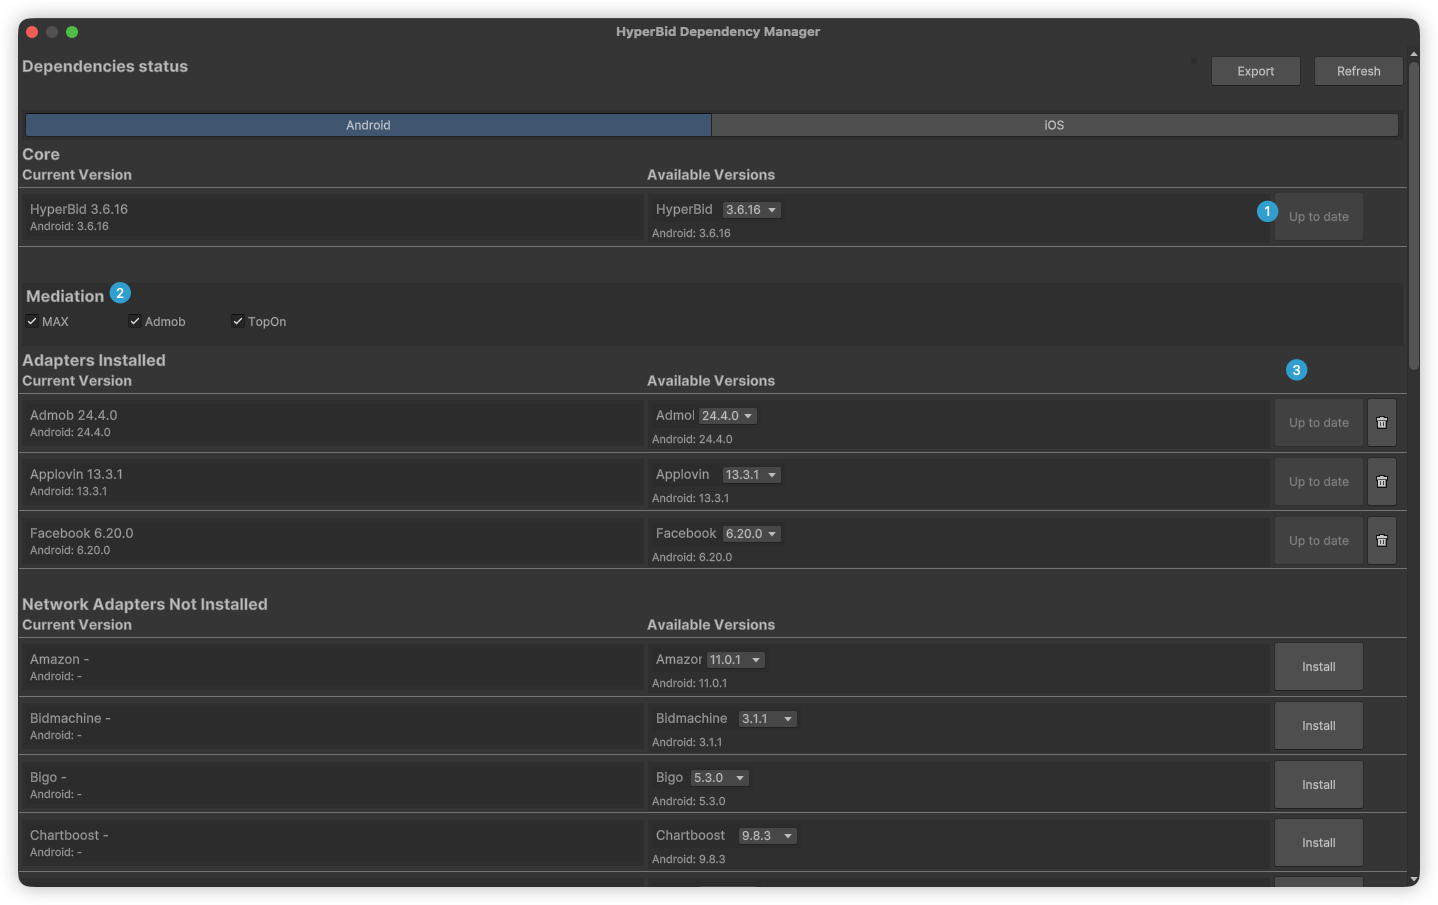
Click the Install button adjacent to your desired adapter, and HyperBid will automatically handle the download and import process.
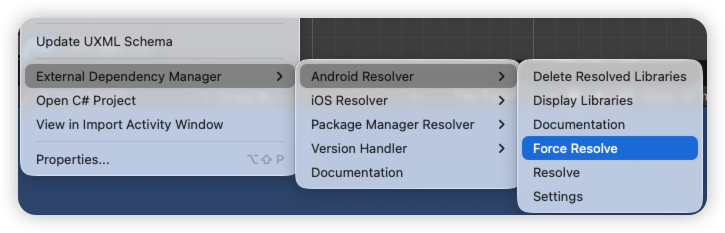
Important: Following adapter installation, it is imperative to execute EDM4U dependency resolution to update the Gradle templates.
Navigation Path: Assets > External Dependency Manager > Android Resolver > Force Resolve
This step ensures that all dependencies are properly incorporated into the final Android build artifacts. For further information, please consult the Google EDM4U Official Repository.
4. Compatibility Handling for Unity 2021 and Earlier Versions (Optional)
When integrating the Google Ads adapter in Unity 2021 or earlier versions, the Android build may encounter the following error:
AAPT: error: unexpected element <property> found in <manifest><application>.This error originates from the new <property> element introduced in GMA SDK 22.5.0, which is not supported by legacy versions of the Android Gradle Plugin (AGP).
Resolution:
- Navigate to
HyperBid > Settings - Enable
Enable GMA properties tag fix - Append the following code to your
mainTemplate.gradlefile:
gradle.projectsEvaluated {
    apply from: 'HyperBidPlugin.androidlib/validate_dependencies.gradle'
}
5. Sample Demo
-
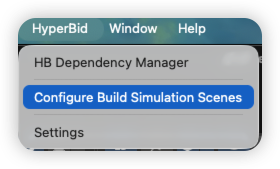
- Upon completing the ad network adapter installation described above, navigate to
HyperBid > Configure Build Simulation Scenesand click to proceed
- Upon completing the ad network adapter installation described above, navigate to
-
- In
Build Profiles > Scene List, the sample Scenes will be automatically selected as illustrated below. Build and deploy to a physical device to experience the demonstration
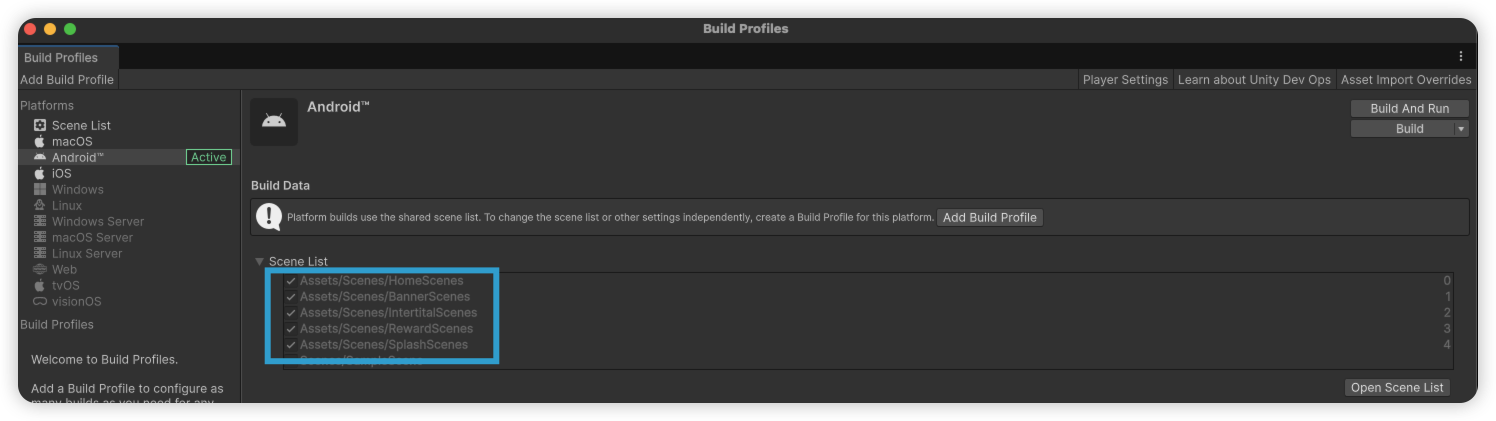
- In
-
- For reference implementation, consult the sample code as depicted below:
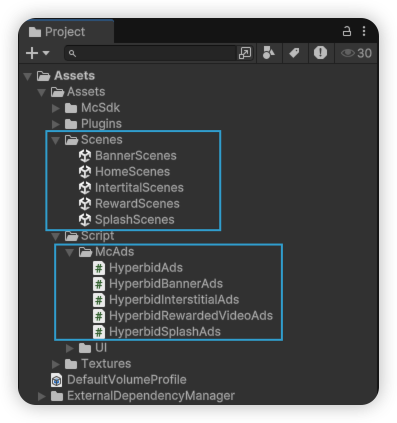
- For reference implementation, consult the sample code as depicted below:
6. Initializing the SDK
McSdkCallbacks.OnSdkInitializedEvent += sdkConfiguration =>
{
    Debug.Log("McSDK Initialized: " + sdkConfiguration.ToString());
    Debug.Log("McSDK Mediation Config: " + McSdk.GetMediationConfig());
};

McSdk.InitializeSdk("your app id", "your app key");
7. Preset Strategy
It is recommended to configure a Preset Strategy to enhance ad loading performance upon the application's initial launch.
;}.cls-2{fill:%230868f7;}.cls-3{fill:url(%23未命名的渐变_44);}.cls-4{fill:%23333;}%3c/style%3e%3clinearGradient%20id='未命名的渐变_8'%20x1='33.73'%20y1='100.61'%20x2='-0.03'%20y2='-1.06'%20gradientUnits='userSpaceOnUse'%3e%3cstop%20offset='0'%20stop-color='%237ae9fb'/%3e%3cstop%20offset='0.67'%20stop-color='%232b90f8'/%3e%3cstop%20offset='1'%20stop-color='%230868f7'/%3e%3c/linearGradient%3e%3clinearGradient%20id='未命名的渐变_44'%20x1='27.86'%20y1='18.67'%20x2='68.36'%20y2='22.22'%20gradientUnits='userSpaceOnUse'%3e%3cstop%20offset='0'%20stop-color='%235ac7f2'/%3e%3cstop%20offset='1'%20stop-color='%230868f7'/%3e%3c/linearGradient%3e%3c/defs%3e%3cpath%20class='cls-1'%20d='M29,28.74V81.91l-9.51-3.68v0L8.52,74A7.17,7.17,0,0,1,4,67.32V24.54A3.76,3.76,0,0,1,9.08,21Z'/%3e%3cpath%20class='cls-2'%20d='M68.09,78.07a13.15,13.15,0,0,1-17.9,12.06L29,81.91h0V28.74L50.19,37A13.17,13.17,0,0,0,68.08,25.3h0Z'/%3e%3cpath%20class='cls-3'%20d='M68.08,25.3a13.19,13.19,0,0,1-6.73,10.87A13.09,13.09,0,0,1,50.19,37L29,28.74V6A3.76,3.76,0,0,1,34.1,2.52l25.59,9.91A13.22,13.22,0,0,1,68.08,25.3Z'/%3e%3cpath%20class='cls-4'%20d='M129.06,81.76a4.33,4.33,0,0,1-3.19-1.31,4.4,4.4,0,0,1-1.31-3.24V56.86H97.65V77.21a4.36,4.36,0,0,1-1.35,3.2A4.68,4.68,0,0,1,93,81.76a4.32,4.32,0,0,1-3.19-1.31,4.37,4.37,0,0,1-1.32-3.24V27.27A4.58,4.58,0,0,1,89.83,24a4.59,4.59,0,0,1,7.82,3.27V48.15h26.91V27.27A4.58,4.58,0,0,1,125.91,24a4.59,4.59,0,0,1,7.82,3.27V77.21a4.37,4.37,0,0,1-1.36,3.2A4.65,4.65,0,0,1,129.06,81.76Z'/%3e%3cpath%20class='cls-4'%20d='M163.77,81.66c-6.57,0-11.76-1.92-15.44-5.7s-5.54-9.07-5.54-15.74a26.76,26.76,0,0,1,2.09-10.43,17.72,17.72,0,0,1,6.67-8.06,19.15,19.15,0,0,1,10.68-2.95,19,19,0,0,1,10.46,2.8,18.7,18.7,0,0,1,6.55,7.36,22.53,22.53,0,0,1,2.36,10.28A4.51,4.51,0,0,1,177,63.77H152.23a10.8,10.8,0,0,0,3.49,6.65c2,1.68,4.88,2.52,8.66,2.52a22.25,22.25,0,0,0,7.54-1.21c.74-.3,1.55-.67,2.37-1.07a3.75,3.75,0,0,1,1.84-.4,4.09,4.09,0,0,1,3,1.15,4,4,0,0,1,1.12,3,4.38,4.38,0,0,1-2.58,3.82,32.34,32.34,0,0,1-6.36,2.61A28.67,28.67,0,0,1,163.77,81.66ZM172.4,55.9a9.72,9.72,0,0,0-1.63-4.56A9.9,9.9,0,0,0,167,48a10.38,10.38,0,0,0-4.64-1.14,12,12,0,0,0-4.77,1.06,9.54,9.54,0,0,0-4.89,5.66,11.78,11.78,0,0,0-.51,2.3Z'/%3e%3cpath%20class='cls-4'%20d='M193,81.64a4.49,4.49,0,0,1-4.51-4.55V27.28A4.58,4.58,0,0,1,189.84,24a4.48,4.48,0,0,1,3.28-1.36A4.36,4.36,0,0,1,196.35,24a4.46,4.46,0,0,1,1.31,3.31V77.09a4.34,4.34,0,0,1-1.35,3.2A4.67,4.67,0,0,1,193,81.64Z'/%3e%3cpath%20class='cls-4'%20d='M263.79,81.71a5.7,5.7,0,0,1-4.2-1.74,5.76,5.76,0,0,1-1.73-4.19V27.37a4.58,4.58,0,0,1,1.35-3.27A4.59,4.59,0,0,1,267,27.37V72.53h24a4.58,4.58,0,0,1,3.27,7.82A4.66,4.66,0,0,1,291,81.71Z'/%3e%3cpath%20class='cls-4'%20d='M424.48,81.74a4.71,4.71,0,0,1-2.71-.88,5.43,5.43,0,0,1-1-1l-.07-.09-12.41-17-5.41,5v9.44a4.31,4.31,0,0,1-1.36,3.19,4.66,4.66,0,0,1-3.3,1.36A4.29,4.29,0,0,1,395,80.42a4.36,4.36,0,0,1-1.32-3.23V27.37A4.58,4.58,0,0,1,395,24.1a4.52,4.52,0,0,1,6.58.12,4.54,4.54,0,0,1,1.24,3.15V56.31l17.72-16.38.05,0a4.8,4.8,0,0,1,2.94-1.11,4.4,4.4,0,0,1,3.27,1.2,4.57,4.57,0,0,1,1.2,3.27,4.44,4.44,0,0,1-.77,2.33,7.45,7.45,0,0,1-1.43,1.65l-11,9.64,13.34,17.68a5,5,0,0,1,1,2.71,4.12,4.12,0,0,1-1.36,3.24A4.64,4.64,0,0,1,424.48,81.74Z'/%3e%3cpath%20class='cls-4'%20d='M317.93,81.76a21.5,21.5,0,1,1,21.17-21.5A21.37,21.37,0,0,1,317.93,81.76Zm0-34.1a12.61,12.61,0,1,0,12.42,12.6A12.52,12.52,0,0,0,317.93,47.66Z'/%3e%3cpath%20class='cls-4'%20d='M212.18,101.22a4.12,4.12,0,0,1-3.05-1.26,4.17,4.17,0,0,1-1.26-3.1V43.34a4.37,4.37,0,0,1,1.3-3.14,4.26,4.26,0,0,1,3.13-1.3,4.19,4.19,0,0,1,3.1,1.26,4.32,4.32,0,0,1,1.26,3.16,20.77,20.77,0,0,1,13-4.54,21.51,21.51,0,0,1,0,43,20.51,20.51,0,0,1-13-4.57V96.86a4.15,4.15,0,0,1-1.3,3.06A4.5,4.5,0,0,1,212.18,101.22Zm17.43-53.63c-6.23,0-12.93,4.11-12.93,12.72a12.73,12.73,0,0,0,25.46,0A12.71,12.71,0,0,0,229.61,47.59Z'/%3e%3cpath%20class='cls-4'%20d='M365.76,81.76a21.5,21.5,0,1,1,21.18-21.5A21.37,21.37,0,0,1,365.76,81.76Zm0-34.1a12.61,12.61,0,1,0,12.42,12.6A12.52,12.52,0,0,0,365.76,47.66Z'/%3e%3c/svg%3e)